Zot Registry Administrator Guide
- Introduction
- Getting started
- Using the command line interface (zli)
- Configuring zot
- Network configuration
- Storage configuration
- Security and hardening
- Syncing and mirroring registries
- Monitoring
- Enterprise-wide zot
- Advanced topics
- Maintenance
- Reference
- Notices
Revised: 2022-06-30
Introduction
What is zot?
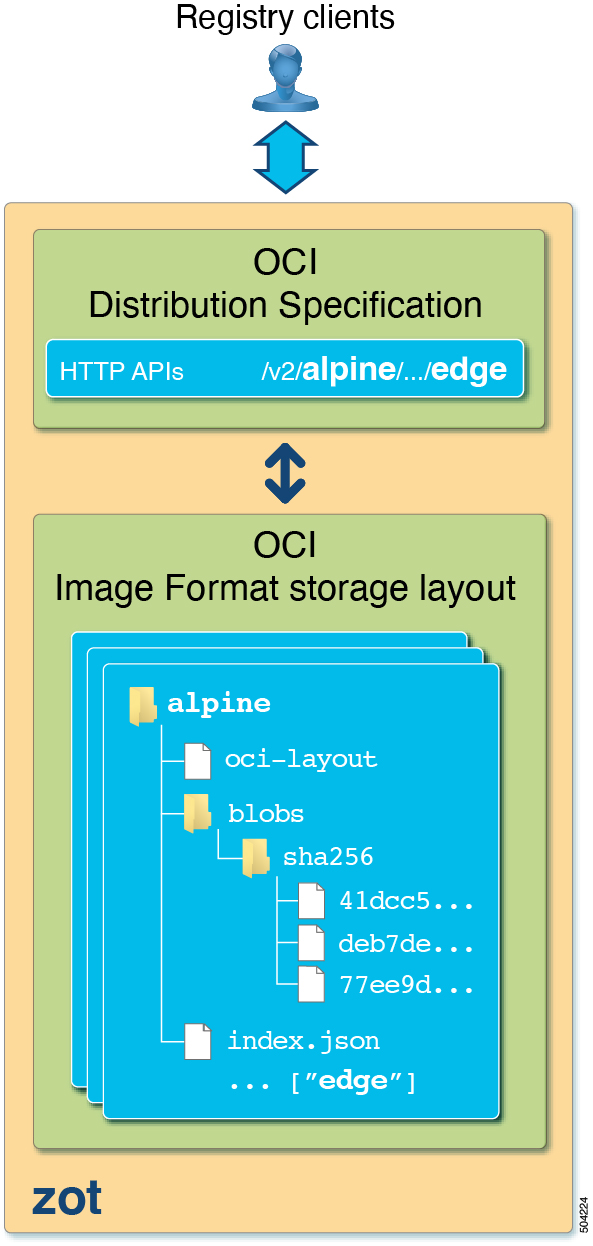
Zot is a production-ready, open-source, vendor-neutral container image registry server based purely on OCI standards.
Two broad trends are changing how we build, distribute, and consume software. The first trend is the increasing adoption of container technologies. The second trend is that software solutions are being composed by combining elements from various sources rather than being built entirely from scratch. The latter trend raises the importance of software provenance and supply chain security. In both trends, zot intends to play an important role by providing a production-ready, open-source, vendor-neutral container image registry server based purely on OCI standards.
What is an OCI image registry?
An OCI image registry is a server-based application that allows you to store, manage, and share container images. A developer uploads (pushes) an image to the registry for distribution. Users can then download (pull) the image to run on their systems. The OCI Distribution Specification, published by the Open Container Initiative (OCI), defines a standard API protocol for these and other image registry operations.
An image registry can be a part of your continuous integration and continuous deployment (CI/CD) pipeline when you host zot on your public or private server. In its minimal form, you can also embed a zot registry in a product. In either case, zot provides a secure software supply chain for container images.
Why zot?
At its heart, zot is a production-ready, vendor-neutral OCI image registry with images stored in the OCI image format and with the OCI distribution specification on-the-wire. Zot is built for developers by developers, offering features such as minimal deployment using a single binary image, built-in authentication and authorization, and inline garbage collection and storage deduplication.
Some of the principal advantages of zot are:
-
Open source
-
OCI standards-only both on-the-wire and on-disk
-
Clear separation between core distribution spec and zot-specific extensions
-
Software supply chain security, including support for cosign and notation
-
Security hardening
-
Single binary with many features built-in
-
Suitable for deployments in cloud, bare-metal, and embedded devices
Zot fully conforms to the OCI Distribution Specification.
The following table lists additional advantages of zot:
| zot | |
|---|---|
Last stable release |
TBD |
License |
Apache 2.0 |
On-premise deployment |
yes |
OCI conformance* |
yes |
Single binary image* |
yes |
Minimal build* |
yes |
Storage Layout |
ociv1 image layout |
Authentication |
built-in |
Authorization |
built-in |
Garbage collection |
inline |
Storage deduplication |
inline |
Cloud storage support |
yes |
Delete by tag |
yes |
Vulnerability scanning |
built-in |
Command line interface (cli) |
yes |
ui |
yes |
External contributions |
yes |
CNCF project |
TBD |
distribution-spec conformance |
yes |
Image signatures |
built-in |
| * The minimal build feature is the ability to build a minimal distribution-spec compliant registry in order to reduce library dependencies and the possible attack surface. |
Getting started
How to get zot
The zot project is hosted on GitHub at project-zot. From GitHub, you can download zot executable binary images or full source code.
Supported platforms
Zot is officially supported on Linux and Apple MacOS platforms, using
Intel or ARM processors. However, development
should be possible on any platform that supports the golang toolchain.
| OS | ARCH | Platform |
|---|---|---|
linux |
amd64 |
Intel-based Linux servers |
linux |
arm64 |
ARM-based servers and Raspberry Pi4 |
darwin |
amd64 |
Intel-based MacOS |
darwin |
arm64 |
ARM-based MacOS |
Full and minimal binary images
In addition to variations for specific platforms and architectures, images are also available in full and minimal implementations:
-
A full zot binary image is compiled with all extensions. Extensions include functions such as metrics, registry synchronization, search, and scrub.
-
A minimal distribution-spec conformant zot binary image is compiled with only a minimal set of code and libraries, reducing the attack surface. This option might be optimal for a registry embedded in a shipping product.
Binary image file naming
An executable binary image for zot is named using the target platform and architecture from the Supported platforms and architectures table. The general format of a binary image file name is one of these two:
zot-os-architecture
-
A full zot binary image with all extensions has a filename of the form
zot-os-architecture.For example, the full binary image for an Intel-based linux server iszot-linux-amd64.
zot-os-architecture-minimal
-
A minimal distribution-spec conformant zot binary image has a filename of the form
zot-os-architecture-minimal. For example, the minimal binary image for an Intel-based linux server iszot-linux-amd64-minimal.
Deployment methods
Several options exist for deploying zot:
-
You can launch a zot binary as a container service using a container management tool such as Podman, Docker, or Helm.
-
You can launch zot as a host-level service by downloading a binary image and running it as a systemd service.
-
You can copy or clone the full zot source code and build an image with custom build flags.
Deploying a zot binary image
Executable binary images for supported server platforms and architectures are available from the zot package repository in GitHub.
You can download the appropriate binary image and run it directly on your server, or you can use a container management tool such as Podman, runc, Helm, or Docker to fetch and deploy the image in a container on your server.
For convenience, you can rename the binary image file to simply zot.
|
Example: Deploying with a container manager
Using a container manager such as Podman, runc, Helm, or Docker, you can install a zot binary image, as in the following examples.
podman run -p 5000:5000 ghcr.io/project-zot/zot-linux-amd64:latest
podman run -p 5000:5000 ghcr.io/project-zot/zot-linux-amd64-minimal:latest
docker run -p 5000:5000 ghcr.io/project-zot/zot-linux-amd64:latest
Each of these example commands pulls a zot binary image from the GitHub Container Registry (ghcr.io) and launches a zot image registry at http://localhost:5000.
Building zot from source
Prerequisites
Install golang (1.17+)
The zot project requires golang 1.17 or newer. You can follow
these instructions to install the golang toolchain. After
installation, make sure that the path environment variable or your IDE can find
the toolchain.
Building an executable binary from source
Download or clone the full zot project from GitHub at project-zot. To clone the zot project from GitHub, use this command:
git clone https://github.com/project-zot/zot.git
To build zot, execute the make command in the zot directory
using the following general syntax:
make OS=os ARCH=architecture {binary | binary-minimal}
-
The operating system and architecture options are listed in the Supported platforms and architectures table. If an option is not specified, the defaults are
linuxandamd64. -
The
binaryoption builds the full zot binary image with all extensions. -
The
binary-minimaloption builds the minimal distribution-spec conformant zot binary image without extensions, reducing the attack surface.
For example, to build a zot image with extensions for an Intel-based linux server, use the following command:
make OS=linux ARCH=amd64 binary
The make command builds an executable image in the zot/bin directory.
The original filename of the zot executable image will indicate the
build options. For example, the filename of an Intel-based linux minimal image is
zot-linux-amd64-minimal.
For convenience, you can rename the binary image file to simply zot.
|
Building and deploying a zot container image from source
A sample Dockerfile is provided on the zot project page in GitHub. You can edit the sample file with your specific values, such as the desired operating system, hardware architecture, and full or minimal build, as in this example:
ARG OS=linux
ARG ARCH=amd64

RUN make COMMIT=$COMMIT OS=$OS ARCH=$ARCH clean binary-minimal
Using your edited Dockerfile, you can build a container image that runs the latest zot by running the following command:
make image
Deploy the image using your container manager, such as Podman, runc, Helm, or Docker, as in these examples:
podman run --rm -it -p 5000:5000 -v $(pwd)/registry:/var/lib/registry zot:latest
docker run --rm -it -p 5000:5000 -v $(pwd)/registry:/var/lib/registry zot:latest
A container image built with the sample Dockerfile and deployed with the example
command results in a running registry at http://localhost:5000. Registry content
is stored at .registry, which is bind mounted to /var/lib/registry in
the container. By default, auth is disabled. As part of the build, a YAML
configuration file is created at /etc/zot/config.yml in the container.
You can override the configuration file with custom configuration settings in the deployment command and in a local configuration file as shown in this example:
podman run --rm -p 8080:8080 \
  -v $(pwd)/custom-config.yml:/etc/zot/config.yml \
  -v $(pwd)/registry:/tmp/zot \
  zot:latest
This command causes the registry to listen on port 8080 and to use /tmp/zot for
content storage.
Launching zot
The instructions and examples in this guide use zot as the name of the
zot executable file and do not include the path to the
executable file.
|
The zot service is initiated with the zot serve command followed by
the name of a configuration file.
The configuration file is a JSON or YAML file that contains all configuration settings for zot functions. Using the information in this guide, you can compose a configuration file with the settings and features you require for your zot registry server.
| Before launching zot, you can check your configuration file for errors or conflicts using the procedure described in Verifying the configuration file. |
When ready, you can launch zot using the following command:
zot serve configfile
Using the command line interface (zli)
What is zli?
zli is a binary that implements a set of command line commands for interacting with the zot registry server.
| We recommend installing zli when you install zot. |
How to get zli
zli is hosted with zot on GitHub at project-zot. From GitHub, you can download the zli binary or you can build zli from the source.
Supported platforms
zli is supported for the following operating systems and platform architectures:
| OS | ARCH | Platform |
|---|---|---|
linux |
amd64 |
Intel-based Linux servers |
linux |
arm64 |
ARM-based servers and Raspberry Pi4 |
darwin |
amd64 |
Intel-based MacOS |
darwin |
arm64 |
ARM-based MacOS |
Downloading zli binaries
You can download the executable binary for your server platform and architecture under "Assets" on the GitHub zot releases page.
The binary image is named using the platform and architecture from the
Supported platforms and architectures
table. For example, the binary for an Intel-based MacOS server is
zli-darwin-amd64.
Building zli from source
To build the zli binary, copy or clone the zot project from GitHub
and execute the make cli command in the zot directory.
Use the same command options that you used to build zot, as shown:
make OS=os ARCH=architecture cli
For example, the following command builds zli for an Intel-based MacOS server:
make OS=darwin ARCH=amd64 cli
In this example, the resulting executable file is zli-darwin-amd64 in the
zot/bin directory.
Common tasks using zli
This section includes examples of common zot server tasks using the zli command line interface. For a detailed listing of zli commands, see the zli Command Reference in this guide.
|
The instructions and examples in this guide use The original filename of the executable file will reflect the build options, such as
|
Adding a zot server URL
You can modify the zot server configuration using the zli config add command.
This example adds a zot server URL with an alias of remote-zot:
bin/zli config add remote-zot https://server-example:8080
Use the zli config command to list all configured URLs with their aliases:
$ bin/zli config -l

remote-zot   https://server-example:8080
local        http://localhost:8080
Listing images
You can list all images hosted on a zot server using the zli images command with
the server’s alias:
$ bin/zli images remote-zot

IMAGE NAME        TAG               DIGEST    SIZE
postgres          9.6.18-alpine     ef27f3e1  14.4MB
postgres          9.5-alpine        264450a7  14.4MB
busybox           latest            414aeb86  707.8KB
You can also filter the image list to view a specific image by specifying the image name:
$ bin/zli images remote-zot -n busybox

IMAGE NAME        TAG               DIGEST    SIZE
busybox           latest            414aeb86  707.8KB
Scanning images for known vulnerabilities
Using the zli cve command, you can fetch the CVE (Common Vulnerabilities and
Exposures) information for images hosted on the zot server. This example shows
how to learn which images are affected by a specific CVE:
$ bin/zli cve remote-zot -i CVE-2017-9935

IMAGE NAME        TAG               DIGEST    SIZE
c3/openjdk-dev    commit-5be4d92    ac3762e2  335MB
This example displays a list all CVEs affecting a specific image:
$ bin/zli cve remote-zot -I c3/openjdk-dev:0.3.19

ID                SEVERITY  TITLE
CVE-2015-8540     LOW       libpng: underflow read in png_check_keyword()
CVE-2017-16826    LOW       binutils: Invalid memory access in the coff_s...
This example displays the detailed CVEs in JSON format:
$ bin/zli cve remote-zot -I c3/openjdk-dev:0.3.19 -o json
{
  "Tag": "0.3.19",
  "CVEList": [
    {
      "Id": "CVE-2019-17006",
      "Severity": "MEDIUM",
      "Title": "nss: Check length of inputs for cryptographic primitives",
      "Description": "A vulnerability was discovered in nss where input text length was not checked when using certain cryptographic primitives. This could lead to a heap-buffer overflow resulting in a crash and data leak. The highest threat is to confidentiality and integrity of data as well as system availability.",
      "PackageList": [
        {
          "Name": "nss",
          "InstalledVersion": "3.44.0-7.el7_7",
          "FixedVersion": "Not Specified"
        },
        {
          "Name": "nss-sysinit",
          "InstalledVersion": "3.44.0-7.el7_7",
          "FixedVersion": "Not Specified"
        },
        {
          "Name": "nss-tools",
          "InstalledVersion": "3.44.0-7.el7_7",
          "FixedVersion": "Not Specified"
        }]
    }]
}
This example lists all images on a specific zot server that are affected by a specific CVE:
$ bin/zli cve remote-zot -I c3/openjdk-dev -i CVE-2017-9935

IMAGE NAME        TAG               DIGEST    SIZE
c3/openjdk-dev    commit-2674e8a    71046748  338MB
c3/openjdk-dev    commit-bd5cc94    0ab7fc76
This example lists all images on a specific zot server where the CVE has been fixed:
$ bin/zli cve remote-zot -I c3/openjdk-dev -i CVE-2017-9935 --fixed

IMAGE NAME        TAG                       DIGEST    SIZE
c3/openjdk-dev    commit-2674e8a-squashfs   b545b8ba  321MB
c3/openjdk-dev    commit-d5024ec-squashfs   cd45f8cf  321MB
Configuring zot
Configuration file
The instructions and examples in this guide use zot as the name of the
zot executable file. The examples do not include the path to the
executable file.
|
The zot service is initiated with the zot serve command followed by
the name of a configuration file. The configuration file is a JSON or YAML file
that contains all configuration settings for zot functions such as:
-
network
-
storage
-
authentication
-
authorization
-
logging
-
metrics
-
synchronization with other registries
-
clustering
A simple JSON configuration file is shown in the following example.
{
    "distSpecVersion": "1.0.1",
    "storage": {
        "rootDirectory": "/tmp/zot"
    },
    "http": {
        "address": "127.0.0.1",
        "port": "8080"
    },
    "log": {
        "level": "debug"
    }
}
The configuration file contains the distribution specification version
(distSpecVersion). The structure and content of other attributes are described
in the later sections of this guide.
Using the information in this guide, you can compose a configuration file with the settings and features you require for your zot registry server.
Extension features
With a full zot image, additional extension features can be enabled and
configured under an extensions attribute in the configuration file as shown in
the following example.
{
...
  "extensions": {
    "metrics": {},
    "sync": {},
    "search": {},
    "scrub": {}
  }
}
The extension features are available only with a full zot image.
With a minimal zot image, the extensions section is ignored if present.
|
The following features are configured under the extensions attribute.
An extension feature is enabled by the presence of the feature’s attribute
under extensions. An extension feature can be disabled by omitting the feature
attribute or by including an enable attribute with a value of false.
For example, the scrub feature is enabled in the following cases.
"extensions": {
  "scrub": {}
}
"extensions": {
  "scrub": {
    "enable": true
  }
}
The scrub feature is disabled in the following cases.
"extensions": {
}
"extensions": {
  "scrub": {
    "enable": false
  }
}
Verifying the configuration file
Before launching zot, verify the syntax of your configuration file using the following command:
zot verify configfile
| Verifying the configuration file protects against operator errors and any conflicts arising from zot release version changes. |
After verifying your configuration file, you can launch zot with the following command:
zot serve configfile
Network configuration
Use the http attribute in the configuration file to configure the zot
network settings, as shown in the following example.
"http": {
  "address":"127.0.0.1",
  "port":"8080",
  "realm":"zot",
  "tls": {
    "cert":"test/data/server.cert",
    "key":"test/data/server.key"
  }
}
The following table lists the configurable attributes.
| Attribute | Description |
|---|---|
|
The IP address of the zot server. |
|
The port number of the zot server. |
|
The security policy domain defined for the server. |
|
The included attributes in this section specify the Transport Layer Security (TLS) settings for the server. |
|
The path and filename of the server’s SSL/TLS certificate. |
|
The path and filename of the server’s registry key. |
Storage configuration
Storage options
With zot, you have the option to store your registry image files either in local filesystem storage or in cloud storage, such as an Amazon Simple Storage Service (S3) bucket.
Configuring local storage
Local filesystem storage for zot is configured with the storage
attribute in the configuration file, as shown in the following example.
"storage":{
  "rootDirectory":"/tmp/zot",
  "commit": true,
  "dedupe": true,
  "gc": true,
  "gcDelay": "1h",
  "gcInterval": "24h"
}
The following table lists the configurable attributes.
| Attribute | Description |
|---|---|
|
Location of the images stored in the server file system. |
|
For faster performance, data written by zot is retained in memory before
being periodically committed to disk by the operating system. To eliminate this
retention time and cause data to be written to disk immediately, set to |
|
If the server filesystem supports hard links, you can optimize storage space by enabling
inline deduplication of layers and blobs that are shared among multiple container images.
Deduplication is enabled by default. Set to |
|
When an image is deleted, either by tag or by reference, orphaned blobs
can lead to wasted storage. Garbage collection (gc) is enabled by default
to reclaim this space. Set to |
|
(Optional) If garbage collection is enabled, causes it to run once after
the specified delay time. Requires the |
|
(Optional) If garbage collection is enabled, causes it to run periodically
at the specified interval. Requires the |
|
You can store and serve images from multiple filesystems, each with their own repository paths and settings. The following example shows three subpaths. "storage":{
"subPaths": {
"/a": {
"rootDirectory": "/tmp/zot1",
"dedupe": true,
"gc": true
},
"/b": {
"rootDirectory": "/tmp/zot2",
"dedupe": true
},
"/c": {
"rootDirectory": "/tmp/zot3",
"dedupe": false
}
}
}
|
Configuring S3 storage
Amazon Simple Storage Service (S3) for zot can be configured with the
storageDriver attribute in the configuration file, as shown in the following example:
"storageDriver": {
    "name": "s3",
    "region": "us-east-2",
    "bucket": "zot-storage",
    "secure": true,
    "skipverify": false,
    "accesskey": "<YOUR_ACCESS_KEY_ID>",
    "secretkey": "<YOUR_SECRET_ACCESS_KEY>"
}
As in the case with local filesystem storage, you can use multiple storage
locations using the subpath attribute, as in the following example.
"subPaths": {
    "/a": {
        "rootDirectory": "/zot-a",
        "storageDriver": {
            "name": "s3",
            "region": "us-east-2",
            "bucket": "zot-storage",
            "secure": true,
            "skipverify": false
        }
    },
    "/b": {

[continue]
S3 Credentials
In the first configuration file example, the S3 credentials were configured with the
attributes accesskey and secretkey. As an alternative, you can omit these attributes
from the configuration file and you can configure them using environment variables or a
credential file.
-
Environment variables
Zot looks for credentials in the following environment variables:
AWS_ACCESS_KEY_ID
AWS_SECRET_ACCESS_KEY
AWS_SESSION_TOKEN (optional)
-
Credential file
A credential file is a plaintext file that contains your access keys, as shown in the following example.
[default]
aws_access_key_id = <YOUR_DEFAULT_ACCESS_KEY_ID>
aws_secret_access_key = <YOUR_DEFAULT_SECRET_ACCESS_KEY>

[test-account]
aws_access_key_id = <YOUR_TEST_ACCESS_KEY_ID>
aws_secret_access_key = <YOUR_TEST_SECRET_ACCESS_KEY>

[prod-account]
; work profile
aws_access_key_id = <YOUR_PROD_ACCESS_KEY_ID>
aws_secret_access_key = <YOUR_PROD_SECRET_ACCESS_KEY>
The
[default]heading defines credentials for the default profile, which zot will use unless you configure it to use another profile. You can specify a profile using theAWS_PROFILEenvironment variable as in this example:AWS_PROFILE=test-account
The credential file must be named
credentials.The file must be located in the.aws/folder in the home directory of the same server that is running your zot application.
For more details about specifying S3 credentials, see the AWS documentation.
Security and hardening
Authentication
Zot supports authentication by the following methods:
-
TLS mutual authentication
-
Basic local authentication using an htpasswd file
-
LDAP authentication
-
Bearer (OAuth2) authentication using an HTTP Bearer token
Zot also provides these additional security features:
-
Ability to delay response to an authentication failure in order to prevent automated attacks. See Preventing automated attacks with failure delay.
-
Ability to limit the rate of API calls from users in order to prevent denial-of-service attacks. See Rate limiting.
TLS mutual authentication
Use the tls attribute under http in the configuration file to enable and
configure TLS mutual authentication, as shown in the following example.
"http": {
  "tls": {
    "cert":"test/data/server.cert",
    "key":"test/data/server.key",
    "cacert":"test/data/cacert.cert"
  }
}
The following table lists the configurable attributes.
| Attribute | Description |
|---|---|
|
The path and filename of the server’s SSL/TLS certificate. |
|
The path and filename of the server’s registry key. |
|
The path and filename of the server’s |
Basic authentication
Use the auth and htpasswd attributes under http in the configuration file
to enable and configure local authentication, as shown in the following example.
"http": {
  "auth": {
    "htpasswd": {
      "path": "test/data/htpasswd"
    }
  }
}
The path attribute specifies the path and filename of the .htpasswd file, which
contains user names and hashed passwords.
| When both htpasswd and LDAP configuration are specified, LDAP authentication is given preference. |
LDAP authentication
Use the auth and ldap attributes under http in the configuration file
to enable and configure LDAP authentication, as shown in the following example.
"http": {
  "auth": {
    "ldap": {
      "address": "ldap.example.org",
      "port": 389,
      "startTLS": false,
      "baseDN": "ou=Users,dc=example,dc=org",
      "userAttribute": "uid",
      "bindDN": "cn=ldap-searcher,ou=Users,dc=example,dc=org",
      "bindPassword": "ldap-searcher-password",
      "skipVerify": false,
      "subtreeSearch": true
    }
  }
}
The following table lists the configurable attributes for LDAP authentication.
| Attribute | Description |
|---|---|
|
The IP address or hostname of the LDAP server. |
|
The port number used by the LDAP service. |
|
Set to |
|
Starting location within the LDAP directory for performing user searches. |
|
Attribute name used for a user. |
|
Base Distinguished Name for the LDAP search. |
|
Password of the bind LDAP user. |
|
Skip TLS verification. |
|
Set to |
| When both htpasswd and LDAP configuration are specified, LDAP authentication is given preference. |
Bearer authentication
Zot supports OAuth2 by using a Bearer Token. Use the auth and bearer
attributes under http in the configuration file to enable and configure OAuth2
authentication, as shown in the following example.
"http": {
  "auth": {
    "bearer": {
      "realm": "https://auth.myreg.io/auth/token",
      "service": "myauth",
      "cert": "/etc/zot/auth.crt"
    }
  }
}
The following table lists the configurable attributes.
| Attribute | Description |
|---|---|
|
|
|
|
|
The path and filename of the server’s SSL/TLS certificate. |
Identity-based authorization
User identity can be used as an authorization criterion for allowing actions on one or more repository paths. For specific users, you can choose to allow any combination of read, create, update, or delete actions on specific paths.
For defining policies for specific repository paths, the paths can be specified
explicitly or by using glob patterns with simple or recursive wildcards.
When a repository path matches more than one path description, authorization
is granted based on the policy of the longest (most specific) path matched. For
example, if policies are defined for path descriptions ** and repos2/repo,
the repos2/repo path will match both ** and repos2/repo descriptions.
In this case, the repos2/repo policy will be applied because it is longer.
Note that ** effectively defines the default policy, as it matches any path not matched by any other per-repository policy. To override all other policies, you can specify a global admin policy.
Use the accessControl attribute in the configuration file to define a set of
identity-based authorization policies, as shown in the following example.
"accessControl": {
  "**": {
    "policies": [{
      "users": ["charlie"],
      "actions": ["read", "create", "update"]
    }],
    "defaultPolicy": ["read", "create"]
  },
  "tmp/**": {
    "defaultPolicy": ["read", "create", "update"]
  },
  "infra/*": {
    "policies": [{
        "users": ["alice", "bob"],
        "actions": ["create", "read", "update", "delete"]
      },
      {
        "users": ["mallory"],
        "actions": ["create", "read"]
      }
    ],
    "defaultPolicy": ["read"]
  },
  "repos2/repo": {
    "policies": [{
        "users": ["bob"],
        "actions": ["read", "create"]
      },
      {
        "users": ["mallory"],
        "actions": ["create", "read"]
      }
    ],
    "defaultPolicy": ["read"]
  },
  "adminPolicy": {
    "users": ["admin"],
    "actions": ["read", "create", "update", "delete"]
  }
}
In this example, five policies are defined:
-
The default policy (**) gives all users the ability to read or create content, while giving user "charlie" the additional ability to update content.
-
The policy for
tmp/**matches all repositories undertmprecursively and allows all users to read, create, or update content in those repositories. -
The policy for
infra/*matches all repositories directly underinfra.Separate policies are defined for specific users, along with a default read-only policy for all other users. -
The policy for
repos2/repomatches only that specific repository. -
An admin policy (
adminPolicy) gives the user "admin" global authorization to read, create, update, or delete content in any repository, overriding all other policies.
| Always include the read action in any policy that you define. The create, update, and delete actions cannot be used without the read action. |
Preventing automated attacks with failure delay
Use the auth and failDelay attributes under http in the configuration file
to delay the response to an authentication failure. A delayed response helps to
prevent automated attacks. The configuration is shown in the following example.
"http": {
  "auth": {
    "failDelay": 5
  }
}
The failDelay attribute specifies a waiting time, in seconds, before zot
sends a failure notification to an authenticating user who has been denied access.
Rate limiting
You can limit the rate of API calls from users by configuring the Ratelimit
attribute in the configuration file, as shown in the following example:
"http": {
    "address": "127.0.0.1",
    "port": "8080",
    "Ratelimit": {
        "Rate": 10,
        "Methods": [
            {
                "Method": "GET",
                "Rate": 5
            }
        ]
    }
}
In this example, the Rate attribute directly under Ratelimit sets a global
rate limit of ten API calls per second. You can optionally override the global limit for
specific API Methods. In this example, API GET calls are limited to five per second.
Syncing and mirroring registries
Synchronizing registries
Add the sync attribute under extensions in the configuration file to enable
and configure the periodic or on-demand synchronization of your zot
image registry with other image registries, as shown in the following example.
"extensions": {
    "sync": {
        "enable": true,
        "credentialsFile": "./examples/sync-auth-filepath.json",
        "registries": [
        {
            "urls": [
                "https://registry1:5000"
            ],
            "onDemand": false,
            "pollInterval": "6h",
            "tlsVerify": true,
            "certDir": "/home/user/certs",
            "maxRetries": 5,
            "retryDelay": "10m",
            "onlySigned": true,
            "content": [
            {
                "prefix": "/repo1/repo",
                "tags":
                {
                    "regex": "4.*",
                    "semver": true
                }
            },
            {
                "prefix": "/repo1/repo",
                "destination": "/localrepo",
                "stripPrefix": true
            },
            {
                "prefix": "/repo1/**",
                "destination": "/localrepo",
                "stripPrefix": true
            },
            {
                "prefix": "/repo2/repo*"
            },
            {
                "prefix": "/repo3/**"
            }]
        },
        {
            "urls": [
                "https://registry2:5000",
                "https://registry3:5000"
            ],
            "pollInterval": "12h",
            "tlsVerify": false,
            "onDemand": false,
            "content": [
            {
                "prefix": "/repo2",
                "tags":
                {
                    "semver": true
                }
            }]
        },
        {
            "urls": [
                "https://docker.io/library"
            ],
            "onDemand": true,
            "tlsVerify": true,
            "maxRetries": 6,
            "retryDelay": "5m"
        }]
    }
}
The following table lists the configurable attributes for registry synchronization.
| Attribute | Description | ||
|---|---|---|---|
|
If this attribute is missing, registry synchronization is enabled by default.
Registry synchronization can be disabled by setting this attribute to |
||
|
The location of a local credentials file containing credentials for other registries. |
||
|
The URL of an upstream image registry. You can specify a comma-separated list of multiple URLs for the same registry in case one or more fails. |
||
|
|
||
|
The period in seconds between polling of remote registries. If no value is specified, no periodic polling will occur. |
||
|
|
||
|
If a path is specified, use certificates at this path. If no path is specified, use the default certificates directory. |
||
|
The maximum number of retries if an error occurs during either an on-demand or periodic synchronization. If no value is specified, no retries will occur. |
||
|
The interval in seconds between retries. This attribute is mandatory when maxRetries is configured. |
||
|
|
||
|
The included attributes in this section specify which content will be periodically pulled. If this section is not populated, periodically polling will not occur. The included attributes can also filter which on-demand images are pulled. |
||
|
On the remote server, the path from which images will be pulled. This
path can be a string that exactly matches the remote path, or it can be a |
||
|
Specifies the path under which pulled images are to be stored. |
||
|
Specifies whether the prefix path from the source registry will be retained or replaced when the image is stored in the [zotLowerName] registry.
|
||
|
The included attributes in this optional section specify how remote images will be selected for synchronization based on image tags. |
||
|
Specifies a regular expression for matching image tags. Images whose tags do not match the expression are not pulled. |
||
|
Specifies whether image tags are to be filtered by Semantic Versioning (semver) compliance.
|
Monitoring
Logging
Logging for zot operations is configured with the log attribute in the
configuration file, as shown in the following example.
"log":{
  "level":"debug",
  "output":"/tmp/zot.log",
  "audit": "/tmp/zot-audit.log"
}
The following table lists the configurable attributes.
| Attribute | Description |
|---|---|
|
The minimum level for logged events. The levels are: |
|
The filesystem path for the log output file. The default is |
|
(Optional) If a filesystem path is specified for audit logging, an audit log is enabled and will be stored at the specified path. |
Metrics
The available methods for collecting metrics varies depending on whether your zot installation is a minimal (distribution-spec-only) image or a full image including extensions.
Enabling metrics for a full zot image with extensions
Add the metrics attribute under extensions in the configuration file
to enable and configure metrics, as shown in the following example.
"extensions": {
    "metrics": {
        "enable": true,
        "prometheus": {
            "path": "/metrics"
        }
    }
}
The following table lists the configurable attributes for metrics collection.
| Attribute | Description |
|---|---|
|
If this attribute is missing, metrics collection is enabled by default.
Metrics collection can be disabled by setting this attribute to |
|
Attributes under |
|
The server path on which metrics will be exposed. |
Collecting metrics from a minimal zot image using a node exporter
Although a minimal zot image does not contain a node exporter, it exposes internal metrics in a Prometheus format for collection by a separate node exporter tool such as zxp. The zot companion binary zxp is a node exporter that can be deployed with a minimal zot image in order to scrape metrics from the zot server.
Metrics are automatically enabled in the zot server upon first scrape from the node exporter and the metrics are automatically disabled when the node exporter has not performed any scraping for some period. No extra zot configuration is needed for this behavior.
You can download the zxp executable binary for your server platform and architecture under "Assets" on the GitHub zot releases page.
The binary image is named using the target platform and architecture. For example,
the binary for an Intel-based MacOS server is
zxp-darwin-amd64. To configure the zxp example image, run this command:
zxp-darwin-amd64 config zxp-config-file
For convenience, you can rename the binary image file to simply zxp.
|
| A sample Dockerfile for zxp is available at Dockerfile-zxp. |
The configuration file of zxp contains connection details for the zot
server from which it will scrape metrics. The following JSON structure is an example
of the zxp-config-file contents:
{
    "Server": {
        "protocol": "http",
        "host": "127.0.0.1",
        "port": "8080"
    },
    "Exporter": {
        "port": "8081",
        "log": {
            "level": "debug"
        }
    }
}
|
The zxp module does not have Prometheus integration. The zxp module is not needed with a full zot image. |
Benchmarking zot with zb
With the zb tool, you can benchmark a zot registry or any other container
image registry that conforms to the
OCI Distribution Specification
published by the Open Container Initiative (OCI).
| We recommend installing and benchmarking with zb when you install zot. |
The zb tool is useful for testing workloads in scenarios such as the following:
-
comparing configuration changes
-
comparing software versions
-
comparing hardware/deployment environments
-
comparing with other registries
How to get zb
The zb project is hosted with zot on GitHub at project-zot. From GitHub, you can download the zb binary or you can build zb from the source.
Supported platforms
zb is supported for the following operating systems and platform architectures:
| OS | ARCH | Platform |
|---|---|---|
linux |
amd64 |
Intel-based Linux servers |
linux |
arm64 |
ARM-based servers and Raspberry Pi4 |
darwin |
amd64 |
Intel-based MacOS |
darwin |
arm64 |
ARM-based MacOS |
Downloading zb binaries
Download the executable binary for your server platform and architecture under "Assets" on the GitHub zot releases page.
The binary image is named using the target platform and architecture from the
Supported platforms and architectures
table. For example, the binary for an Intel-based MacOS server is
zb-darwin-amd64.
Building zb from source
To build the zb binary, copy or clone the zot project from GitHub
and execute the make bench command in the zot directory.
Use the same command options that you used to build zot, as shown:
make OS=os ARCH=architecture bench
For example, the following command builds zb for an Intel-based MacOS server:
make OS=darwin ARCH=amd64 bench
In this example, the resulting executable file is zb-darwin-amd64 in the
zot/bin directory.
| A sample Dockerfile for zb is available at Dockerfile-zb. |
Running zb
|
The instructions and examples in this guide use The original filename of the executable file will reflect the build options, such as
|
To view the usage and options of zb, run the command with the --help option:
bin/zb --help
Command output:
`zb`

Usage:
  zb <url> [flags]

Flags:
  -A, --auth-creds string      Use colon-separated BASIC auth creds
  -c, --concurrency int        Number of multiple requests to make at a time (default 1)
  -h, --help                   help for zb
  -o, --output-format string   Output format of test results: stdout (default), json, ci-cd
  -r, --repo string            Use specified repo on remote registry for test data
  -n, --requests int           Number of requests to perform (default 1)
  -v, --version                Show the version and exit
  -d, --working-dir string     Use specified directory to store test data
The following example executes a benchmark operation using zb.
bin/zb http://localhost:8080 -c 10 -n 1000
Command output:
Registry URL: http://localhost:8080

Concurrency Level: 2
Total requests:    100
Working dir:

============
Test name:            Get Catalog
Time taken for tests: 45.397205ms
Complete requests:    100
Failed requests:      0
Requests per second:  2202.7788

2xx responses: 100

min: 402.259µs
max: 3.295887ms
p50: 855.045µs
p75: 971.709µs
p90: 1.127389ms
p99: 3.295887ms

============
Test name:            Push Monolith 1MB
Time taken for tests: 952.336383ms
Complete requests:    100
Failed requests:      0
Requests per second:  105.00491

2xx responses: 100

min: 11.125673ms
max: 26.375356ms
p50: 18.917253ms
p75: 21.753441ms
p90: 24.02137ms
p99: 26.375356ms

...
Enterprise-wide zot
Clustering zot
Zot supports a clustering scheme with stateless zot instances/replicas and a shared remote storage to ensure high-availability of the zot registry. With this scheme, should a few replicas fail or become unavailable, the registry service remains available. In addition, this scheme can increase aggregate network throughput by load balancing across the many zot replicas.
Clustering is supported both in bare-metal and Kubernetes environments.
Bare-metal deployment
Prerequisites
-
A highly-available loadbalancer such as HaProxy configured to point to backend zot replicas
-
Remote storage (mounted locally or S3-compatible)
-
Zot configuration using above remote storage and with deduplication and garbage-collection disabled
Kubernetes deployment
Prerequisites
-
Helm (latest stable release)
-
Kubernetes (latest stable release)
-
Ingress controller
-
Remote storage (S3-compatible)
-
Zot configuration file specifying the above remote storage and with deduplication and garbage-collection disabled
| If authentication is enabled on zot itself, that configuration must also be identical across all replicas. |
Solution overview
clients ←→ loadbalancer ←→ [zot replicas] ←→ [[remote storage]]
All incoming requests from clients are first intercepted at the load balancer and are then routed to one of the zot replicas, which then interfaces with the remote storage.
Advanced topics
Creating a trusted image pipeline with zot, cosign, and notation
Install and start a zot server
This example uses podman to install and start a zot server at http://localhost:5000.
$ podman run -p 5000:5000 ghcr.io/project-zot/zot-linux-amd64:latest
Push or pull using skopeo
Skopeo
is a command line tool for performing operations on container images and
image repositories. In this example, skopeo copies the latest container
image for the busybox application from docker.io to the local zot server.
The image is then copied to a local OCI-layout directory, where it is added
to the manifest.
$ skopeo --insecure-policy copy --format=oci --dest-tls-verify=false \
      docker://busybox:latest docker://localhost:5000/busybox:latest
Getting image source signatures
Copying blob 554879bc3004 done
Copying config 02611c034a done
Writing manifest to image destination
Storing signatures

$ skopeo --insecure-policy copy --src-tls-verify=false \
      docker://localhost:5000/busybox:latest oci:/tmp/images:busybox:latest
Getting image source signatures
Copying blob 554879bc3004 done
Copying config 02611c034a done
Writing manifest to image destination
Storing signatures

$ cat /tmp/images/index.json | jq .
{ "schemaVersion": 2,
  "manifests": [
    {
      "mediaType": "application/vnd.oci.image.manifest.v1+json",
      "digest": "sha256:asdfasdfasdfasdfasdfasdfasdfasdfasdfasdfasdfasdfasdfasdfasdfasdf",
      "size": 347,
      "annotations": {
        "org.opencontainers.image/ref.name": "busybox:latest"
      }
    }
  ]
}
Image signatures
For signing container images, zot supports two open-source signing tools — cosign and notation. In the following examples, a key pair is generated and an image file in the registry is signed using the private key.
$ cosign generate-key-pair
Enter password for private key:
Enter password for private key again:
Private key written to cosign.key
Public key written to cosign.pub

$ cosign sign --key cosign.key localhost:5000/busybox:latest
Enter password for private key:
Pushing signature to: localhost:5000/busybox
$ notation cert generate-test --default --trust "zot-demo"
generating RSA Key with 2048 bits
generated certificates expiring on 2023-04-11T08:02:48Z
wrote key: /home/user1/.config/notation/key/zot-demo.key
wrote certificate /home/user1/.config/notation/certificate/zot-demo.cert
zot-demo: added to the key list
zot-demo: marked as default
zot-demo: added to the certificate list

$ notation sign --plain-http localhost:5000/busybox:latest
sha256:asdfasdfasdfasdfasdfasdfasdfasdfasdfasdfasdfasdfasdfasdfasdfasdf

$ notation list --plain-http localhost:5000/busybox:latest
sha256:1234567812345678123456781234567812345678123456781234567812345678

$ notation verify --plain-http localhost:5000/busybox:latest
sha256:asdfasdfasdfasdfasdfasdfasdfasdfasdfasdfasdfasdfasdfasdfasdfasdf
Maintenance
Scrubbing the image registry
To check the integrity of the filesystem and the data in the registry, you can schedule a periodic scrub operation. The scrub process traverses the filesystem, verifying that all data blocks are readable. While running, the process may slightly reduce the registry performance.
To enable scrubbing, add the scrub attribute under extensions in the
configuration file, as shown in the following example:
"extensions": {
  "scrub": {
    "enable": true,
    "interval": "24h"
  }
}
The following table lists the configurable attributes for scrubbing the registry.
| Attribute | Description |
|---|---|
|
If this attribute is missing, registry scrubbing is enabled by default.
Scrubbing can be disabled by setting this attribute to |
|
The time interval between periodic scrub operations. This value must be at
least two hours ( |
Searching and querying images
While basic searching is always enabled for images in the zot registry, you can enable enhanced registry searching and filtering using graphQL.
Add the search attribute under extensions in the configuration file to enable
and configure the enhanced search extension, as shown in the following example.
"extensions": {
    "search": {
        "enable": true,
        "cve": {
            "updateInterval": "2h"
        }
    }
}
The following table lists the configurable attributes for enhanced search.
| Attribute | Description |
|---|---|
|
If this attribute is missing, enhanced search is enabled by default. Enhanced
search can be disabled by setting this attribute to |
|
Extends enhanced search to allow searching of Common Vulnerabilities and Exposures (CVE). |
|
Sets the interval at which the searchable database of CVE items is refreshed. |
Reference
zli Command Reference
zli
$ bin/zli --help

Usage:
  zli [flags]
  zli [command]

Available Commands:
  completion  Generate the autocompletion script for the specified shell
  config      Configure zot registry parameters for CLI
  cve         Lookup CVEs in images hosted on the zot registry
  help        Help about any command
  images      List images hosted on the zot registry

Flags:
  -h, --help      help for zli
  -v, --version   show the version and exit

Use "zli [command] --help" for more information about a command.
zli completion
This command generates the autocompletion script for zli for the specified shell.
See each sub-command’s help for details on how to use the generated script.
$ bin/zli completion --help

Usage:
  zli completion [command]

Available Commands:
  bash        Generate the autocompletion script for bash
  fish        Generate the autocompletion script for fish
  powershell  Generate the autocompletion script for powershell
  zsh         Generate the autocompletion script for zsh

Flags:
  -h, --help   help for completion

Use "zli completion [command] --help" for more information about a command.
zli config
This command modifies and lists modified settings for a running zot registry.
$ bin/zli config --help

Usage:
  zli config <config-name> [variable] [value] [flags]
  zli config [command]

Examples:
  zli config add main https://zot-foo.com:8080
  zli config main url
  zli config main --list
  zli config --list

Available Commands:
  add         Add configuration for a zot registry

Flags:
  -h, --help    help for config
  -l, --list    List configurations
      --reset   Reset a variable value

Use "zli config [command] --help" for more information about a command.

Useful variables:
  url		zot server URL
  showspinner	show spinner while loading data [true/false]
  verify-tls	enable TLS certificate verification of the server [default: true]
zli cve
This command lists CVEs (Common Vulnerabilities and Exposures) of images hosted on the zot registry
$ ./zli cve --help

Usage:
  zli cve [config-name] [flags]

Flags:
  -i, --cve-id string   List images affected by a CVE
      --fixed           List tags which have fixed a CVE
  -h, --help            help for cve
  -I, --image string    List CVEs by IMAGENAME[:TAG]
  -o, --output string   Specify output format [text/json/yaml]. JSON and YAML format return all info for CVEs
      --url string      Specify zot server URL if config-name is not mentioned
  -u, --user string     User Credentials of zot server in USERNAME:PASSWORD format
zli images
This command lists images hosted on the zot registry.
$ ./zli images --help

Usage:
  zli images [config-name] [flags]

Flags:
  -d, --digest string   List images containing a specific manifest, config, or layer digest
  -h, --help            help for images
  -n, --name string     List image details by name
  -o, --output string   Specify output format [text/json/yaml]
      --url string      Specify zot server URL if config-name is not mentioned
  -u, --user string     User Credentials of zot server in "username:password" format
      --verbose         Show verbose output

Run 'zli config -h' for details on [config-name] argument
Notices
Bias-Free language
The documentation set for this project strives to use bias-free language. For the purposes of this documentation set, bias-free is defined as language that does not imply discrimination based on age, disability, gender, racial identity, ethnic identity, sexual orientation, socioeconomic status, and intersectionality. Exceptions may be present in the documentation due to language that is hardcoded in the user interfaces of the project software, language used based on RFP documentation, or language that is used by a referenced third-party product.